
During an Office 365 migration, it can be useful to set the regional configuration before the user logon the first time.
Specify the regional setting prevents the user to register the language and time zone again. Moreover, when you want to import PST files into the new office 365 Mailbox, default folders must have the same name. Otherwise you will get two folders for each default folder, like inbox, Sent, Drafts…
Regional configuration
This modification can be done using the Office 365 Exchange cmdlet or we can use a powershell script. Let’s see how to do that.
Import Regional Configuration
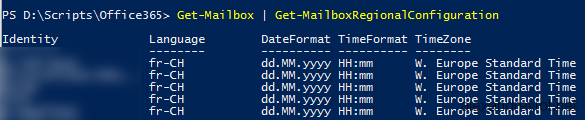
In Office 365, to set the regional configuration, we need to use the Set-MailboxRegionalConfiguration cmdlet. Parameters are:
- Identity, email addresse of the mailbox.
- Language, language used. Need to be formated as fr-ch, en-us, fr-fr, etc.
- DateFormat, date format like dd.MM.yyyy or MM.dd.yyyy.
- TimeFormat, Time format like HH:mm
- TimeZone, the timezone of the mailbox. Like W. Europe Standard Time
Set-MailboxRegionalConfiguration
Powershell Script
Of course, it is possible to run a script in order to import the configuration into several mailboxes.
param([parameter(Mandatory=$true)] [String]$FileCSV) $Users = Import-Csv $FileCSV Foreach ($User in $Users){ $Identity = $User.Identity $Language = $User.Language $DateFormat = $User.DateFormat $TimeFormat = $User.TimeFormat $TimeZone = $User.TimeZone Write-Host $Identity $Language $DateFormat $TimeFormat $TimeZone if ($TimeZone -like "") { Set-MailboxRegionalConfiguration -Identity $Identity -Language $Language -DateFormat $DateFormat -TimeFormat $TimeFormat -LocalizeDefaultFolderName:$true }else{ Set-MailboxRegionalConfiguration -Identity $Identity -Language $Language -DateFormat $DateFormat -TimeFormat $TimeFormat -TimeZone $TimeZone -LocalizeDefaultFolderName:$true } } |
The CSV file must be like:
CSV File Regional Settings
More
You can get more information about the cmdlet Get-MailboxRegionalConfiguration here.
